Thursday, December 31, 2009

Etsy finds!!!

Here's a rundown of my etsy finds this week...
A scarfette

These dolls are super adorable, and she sells the pattern too :)

These handmade bookplate stamps are awesome.

This pouch is adorable, and indeed I do love books :)

I love this tree pillow!!!

cute party idea!


Pears as place cards
found at Sweet Paul's blog

I also love this card tree


and this advent calendar made out of matchbooks.

Old stuff


and I don't know where it came from. I'm usually pretty good about citing my sources, but this post fails in that regard.

love this patio!

I love the idea of chalkboard paint! Here are some DIY ideas:


Last day of 2009!

It's the last day of the decade, and I'm back with a ton of back-log of cool stuff that I love. I'll start with this:

It's marvelous, and I found it over at Little Dash, in this post. She also made the cutest pirate bird:

I really want to try to make a stuffed animal. I don't know why, but I'm nervous about getting into crafts that involve stuffing. I think it's because I don't want to have to go out a buy a ton of it. Haha I'm kind of a dork!

Friday, November 20, 2009

Frame decoration

Once again, no idea where I got this. But it's neat :)

Garden

Later in life, I want a beatiful garden. It is a non-negotiable requirement of any living arrangement. :)

I don't know where I got this photo. Sorry :/

Thursday, November 5, 2009

New ideas

Both of these ideas are from the book Junk Beautiful: Outdoor Edition by Sue Whitney. You can preview it at Amazon.


This is an old washboard with house numbers on it, and planted in the ground.


And this is a candleholder made from the inside of an old electric heater.


You can check the blog, too, at http://junkmarketstyle.com/

Tuesday, October 13, 2009

Embellish with words

Looking for words, I came across a ton of cool sayings:

  • Be your own kind of beautiful
  • Life is a journey and only you hold the map
  • The more you read the more things you will know. The more you learn the more places you'll go. - Dr. Seuss
  • Live. Laugh. Love.
  • Be careful how you address the Queen!
  • Enjoy the little things...
  • Faith*Family*Friends
  • I love thee with the depth and breadth and height my soul can reach. - Elizabeth Barrett Browning
  • No Bees, No Honey, No Work, No Money
  • Not all those that wander are lost. - J.R.R. Tolkein
  • One Fish Two Fish Red Fish Blue Fish - Dr. Seuss

more at Signs & Sayings

Put cool sayings on mirrors, frames, clocks, tiles, etc :)

Wall letters

Wall letters are super easy to make, and everyone loves them! How cool would it be to make and sell wall letters? Ideas:


(from favecrafts)


(cute letter ideas from prettypersonalgifts.com)


*instead of painting, could just use neat paper :)

Recycling old sweaters

from favecrafts

Pillows- Use a pillow form to help you measure and mark the size for your throw pillow on the old sweater. You need a sewing machine for this project or a bit of patience with hand sewing. Follow this tutorial to create Recycled Sweater Pillows.

Potholders- Stitch several layers of the old sweater together and add binding or trim around the edges to create potholders. You can also use thick quilt batting to fill the inside of your upcycled sweater potholder.

Plastic Bag Holder- Have a dog you need to clean up after on walks? Use the sleeve of an older sweater to create a handy plastic bag holder to hang from a door. The stretchy wrist end is perfect for the bottom and you don’t even need to stitch it closed. Just cut the shoulder seam and sew a neater edge. You can add embellishments such as ric-rac at the edges or cut out “Dog Walk” in fabric letters and appliqué to the sweater sleeve. Loop a piece of elastic and sew to the top to hang from a door.

Coffee Cup Sleeves or Water Bottle Cozies- Cut a band in your old sweater sleeve to make a coffee cup sleeve, or use a larger piece of the sleeve for a water bottle cozy. You can felt the sweater first to make a more solid material fit for embroidery and other embellishing.

Paper Craft- Cut out small pieces of wool for embellishing scrapbook pages or handmade cards. Cut out letters or even tiny sweater or scarf shapes for autumn. Make a wonderfully textured tree with an old fuzzy angora sweater.

Blanket or Quilt- If you have several old sweaters, turn them into lovely blanket or quilt. You can cut the sweaters into blocks or varying shapes, and even use the ribbing for the edges of the blanket. Check out this photo tutorial on quilt piece cutting for help. Some sweaters may be too thick for the sewing machine, so you will have to pin and hand-sew pieces together with right sides facing and ½ inch seam allowance. If seams do not lay flat after steam-ironing, hand-stitch seams to back of the blanket. Thinner sweaters can be sewn with the sewing machine and can be given a fabric backing.

Toys- Whether felted or not, old sweaters are a great material for making toys or stuffed animals. Create a puppet with the sleeve of a sweater. Hem the cut edge to prevent fraying. To make the head of the puppet, you can simply sew the cuff together straight across or trim a curved line and sew. For a puppet with hair, gather a few inches of the cuff and weave the thread back and forth. Pull tight and secure the thread. Cut off some of the gathered cuff to leave fuzzy hair.

Tuesday, September 29, 2009

Videojug - how to make a dress from a shirt

Videojug.com is pretty cool, and it isn't blocked at work like youtube is. hooray!!!


Made By You:
How To Convert A T-Shirt Into A Sexy Dress

Friday, September 4, 2009

Yoga party

Through one of my fav blogs party perfect, I found this posting about a yoga party. It was for a little girl, but how awesome would it be for adults? Maybe a little event for my sorority sisters?

The invites were made to look like little rolled up yoga mats - the cutest idea ever


The party banner was made of "prayer flags"... whatever that is, it's cute

And they screen printed organic t-shirts at the party (with a happy mandala sign)

Friday, August 28, 2009

Cute bookplates


I can't remember where I found them, but it was a free printable file. They are super cute! I love the idea of bookplates, and want to put them in all my books. Should I find one particular style to use on all of them? or should I use whatever catches my fancy at the time, like these? Hmm

Make this!


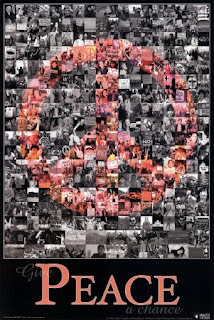
How to make a collage-type poster with your own images:
1. Start with a sheet of paper the desired size of your poster (If it's larger than average, you can find paper on a roll purchaseable by the yard - I found some in the framing section at Manglesen's)
2. Gather all the pictures you'd like to use in a folder on your computer. For a poster like the one above, change them all to greyscale. To make the image (in this case, a peace sign) choose the pictures to be that image, and change the tint. You can do this by fiddling with your computer's image editor, or go to lunapic.com, upload the photo, under the adjust tab select black and white, then under that same tab select color tint.
3. Once you have all your pictures, print them off or send them to a photo lab (i use walgreens.com)
4. Choose placement of photos, cut your colored pictures to the desired shape, and glue everything down using a spray adhesive or other glue - rubber cement works well. Make sure to choose an adhesive that can be pulled up and moved or re-cut if necessary.
5. You can take it somewhere and have it laminated if you would like, or just hang as is.

Friday, August 21, 2009

I'm back!

So if I had time to knit anymore, my next project would come from this guy. Knitkid is awesome! I love it that he sent hats to random people on his flickr, for free. It also helps that his designs are sweet :)


Friday, August 7, 2009

I've always wanted to make a terrarium


sweet tutorial here

wedding inspirations

oncewed.com

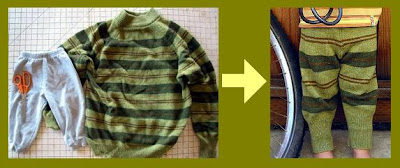
Sweater Sleeve into Kid's Pants

Tutorial over at Green Kitchen, a sweet craft blog that I now plan on visiting frequently. Not while at work, of course ;)

I love this wallpaper


cookies

Better Bit of Butter makes the cutest cookies

Better Bit of Butter website

Wednesday, August 5, 2009

cute idea for my handmade paper


An ABC book!!!

Paper Making

I've always wanted to make my own paper, after I did it during craft night at the local library. I gave it up after a failed attempt at making my own frames. But now it sounds like a cool idea again.

How to make paper, with help from funsci.com, among other websites

Supplies
  • deckle: wooden frame {idea: frames from dollar tree!}
  • mold: sieve with holes of about 1 mm {budget saver: tulle}
  • formica sheet {anything hard and flat in the right size will suffice, like if a picture frame is used, the glass could substitute for the formica}
  • rectangular container large enough to fit the frame
  • mortar and pestle or blender
  • jug
  • hairdryer
  • newspaper {this tutorial recycles newspaper into paper; other materials could be used for a different effect: tissue paper, toilet paper, colored paper, printer paper,magazines, old cards, paper bags, napkins, construction paper, etc
  • optional additions: dried grass, flowers
  • flat sponge
  • water
Instructions
  • cover one side of the frame with the mold (screen, tulle, whatever)
  • soak the paper in water for a long time
  • in the funsci.com tutorial, excess water is sqeezed out of the paper, which is then crushed into a fine paste using the mortar and pestle, then added to the water. an alternative is to simply blend the paper-water mix
  • add paper mix to the rectangular container, adding water to get the right consistency {and some liquid starch, if wanted} this is also when you can add extra bits of torn up paper or other optional additions to get a unique finish
  • immerse the frame into the paste, with the sieve side facing down. slowly remove it, with a layer of paper paste on top of the mold
  • let the water drain, place the formica/hard surface on top of the paste to sqeeze out more water; use the sponge to suck water from the bottom through the mold
  • flip over the frame so that the paper rests on the formica
  • now it just has to dry! at the library, we flipped it onto paper towels, which help suck out moisture. you could use the hair dryer to speed up the drying process, or hang dry from a clothesline.
finished product:

I'd love to add another paper-making post later, with my own pictures and results :)

Tuesday, August 4, 2009

cool beans

recycled milk container dump truck; found here

more from Amy Atlas

I love this cake designed for a mother's day brunch all-green dessert table:
and i love the all-green candy set up
they also designed a poker-themed dessert table for a charity event. "Poker rice crispy treats, chocolate covered dice, as well as chocolate bars with poker wrappers were a few of the highlights on this dessert table."

I love Halloween

And I love Halloween parties


found at amyatlas, who has TONS of cute party themes in her portfolio